This behavior need Dreamweaver version CS3 or more
Import on:
You can define which event on the page start the import the Xml file.
The value can be:
| On Page Load | on the OnLoad event of the page |
Post variable
| when the request.form variable exists |
Get variable
| when the request.querystring variable exists |
Session variable
| when the session variable exists |
Cookie variable
| when the request.Cookie variable exists |
Redirect page:
The page you want redirect after the import process is end
Display errors:
If checked after the import process is end and if there are errors, display a table with the list of errors, the SqlQuery and the line number.
Import from:
You have 2 method to define the source Xml file, with a Path or with a Url.
Use the path when the file is inside your site or when the user upload a file and use the Url when you get the file Xml from another site.
File path:
The file path of the Xml file you want import from. The path must be relative to a file inside the site root or ina folder. Normally the user must upload the file Xml so you must create an upload page with your standard upload method where the user can upload a Xml file in a folder inside your site. The upload file must have the same name you setup in this field and all the time the user want import from Xml file must upload a file with this name or you can setup the upload page to change the name of the uploaded file and give all the times the same name.
File url:
The file url in case you setup the Import Method to Url.
Must be a full Url like: http://www.yoursite.com/yourfolder/yourfile.xml
Is not required the extension is xml but the page must return a valid xml content.
Row elements:
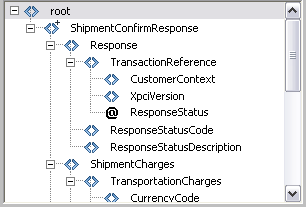
Display the nodes elements will be available in the Xml.
This is an example:

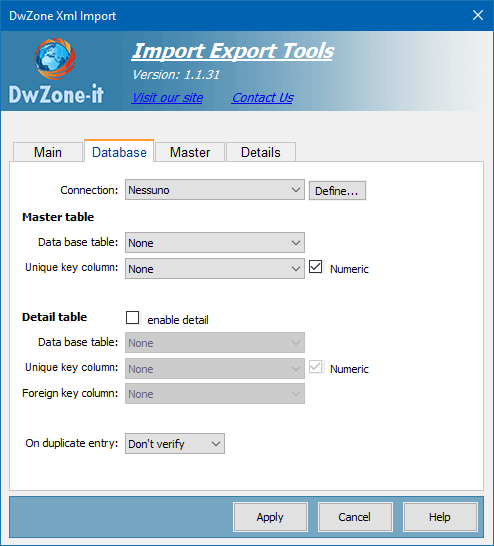
DataBase panel

Connection:
In the Connection pop-up menu, select a connection to the database. Click the Define button if you need to define a connection
This behavior can be used to insert data in a single table or in a master-details tables.
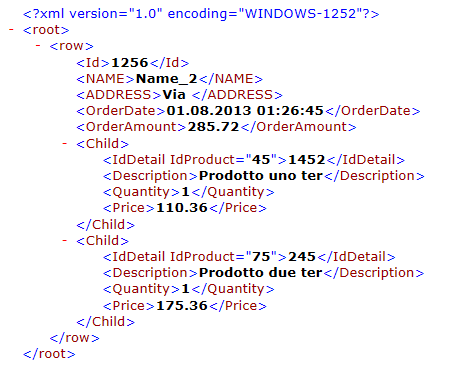
This is an example of what you can import with this behavior:

You can see in this image there is the ROW tag that is the master table record and the 2 CHILD that are the details records. The behavior can be used to insert/update xml like this example.
Master table
Data base table:
In the Data Base Table pop-up menu, select the database table into which the record should be inserted
Unique column key:
In the Unique Key Column pop-up menus, select a key column (usually the record ID column) to identify the record in the database table.
Select the Numeric option if the value is a number. A key column usually accepts only numeric values, but sometimes it accepts text values.
Detail table
Enable detail:
If checked enable the patameters for the details table.
Data base table:
In the Data Base Table pop-up menu, select the database table into which the details record should be inserted
Unique key column:
In the Unique Key Column pop-up menus, select a key column (usually the record ID column) to identify the record in the database details table.
Select the Numeric option if the value is a number. A key column usually accepts only numeric values, but sometimes it accepts text values.
Foreign key column:
The foreign key column is the details table field that join the records of the details table to the record of the master table.
On duplicate entry:
Define what the extension do if find a duplicated item in the import list. The extension before insert the record can verify if the item exist in the database and you can setup what do in this case.
The available value are:
|
| Don't verify | In this case the extension don't verify if there are duplicated record, but insert all the records |
| Skip | The record is not inserted and the extension skip the record. |
Update
| The extension update the record with the value from the import Xml file. |
| Throw error | Generate an error and the record is not inserted and not updated. This error will be displayed after the end of the import process and only if the Display errors is checked. |
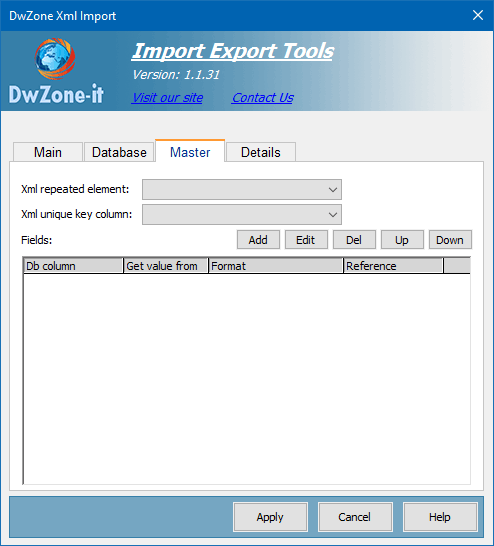
Master panel

Xml repeated element:
The nodes name of the xml file that must be inserted in the database. The extension will insert a record each node with this name. In this field you will see only the elements node at the first level in your xml file.
Xml unique column key:
The node/attribute that contain the unique identifier for the xml element. Only if you setup a behavior in the On duplicate entry combo
To determine if a record exist the extension search in the table if there is a record where the Unique Column Key for the Database and the Unique Column Key for the Xml file are equal.
Fields:
The list of DataBase fields you want import fropm the xml and the reference you setup for each fields. Use the Add/Edit button to poputale this list. When you click on the Add or on the Edit butto a PopUp open with all the parameters you can setup for each DataBase fields.
Db field:
The DataBase field name
Get value from:
This combo define where get the value for each database fields.
Normally you get the value from the Xml file but may be for some fields you need get the value from other source like session variable, application variable, cookie variable, parameter send with querystring or with a form or also entered value.
Xml node:
Define from which node/attribute of the Xml you need get the db field value. In this list you will find only the childnodes of the xml node you select in the Xml repeated element combo
Reference name:
The name of the asp-object where get the value like session variable, application variable, cookie variable, parameter send with querystring or with a form or also entered value. This is enabled on ly when you select a Get value from that is not xml file
Format:
The format of the data you have in your xml.
The available format are:
Text
Numeric (Integer)
Numeric (0,000.00)
Numeric (0.000,00)
Date DD.MM.YYYY
Date DD.MM.YYYY h:m
Date DD.MM.YYYY h:m:s
Date MM.DD.YYYY
Date MM.DD.YYYY h:m
Date MM.DD.YYYY h:m:s
Date YYYY.MM.DD
Date YYYY.MM.DD h:m
Date YYYY.MM.DD h:m:s
Date DD/MM/YYYY
Date DD/MM/YYYY h:m
Date DD/MM/YYYY h:m:s
Date MM/DD/YYYY
Date MM/DD/YYYY h:m
Date MM/DD/YYYY h:m:s
Date YYYY/MM/DD
Date YYYY/MM/DD h:m
Date YYYY/MM/DD h:m:s
Date DD-MM-YYYY
Date DD-MM-YYYY h:m
Date DD-MM-YYYY h:m:s
Date MM-DD-YYYY
Date MM-DD-YYYY h:m
Date MM-DD-YYYY h:m:s
Date YYYY-MM-DD
Date YYYY-MM-DD h:m
Date YYYY-MM-DD h:m:s
Boolean (true,false)
Boolean (1,0)
Boolean (-1,0)
Boolean (Y,N)
Boolean (Yes,No)
There are 2 format need more info: Numeric (0,000.00) and Numeric (0.000,00), the first is a number with the . (comma) decimal separator like 12345.67 and the second is a number with a , (virgola) decimal separator like 12345,67
In the SqlQuery all the number with decimal value must be inserted with the point decimal separator and without the GroupDigit separator, and you must choose the format for the number valur you receive from the Xml file so the extension will format the value in the exact format the SqlQuery need.
Details panel
Xml repeated element:
The nodes name of the xml file that must be inserted in the database. The extension will insert a record each node with this name. In this field you will see only the elements node at the first level in your xml file.
Xml unique column key:
The node/attribute that contain the unique identifier for the xml element. Only if you setup a behavior in the On duplicate entry combo
To determine if a record exist the extension search in the table if there is a record where the Unique Column Key for the Database and the Unique Column Key for the Xml file are equal.
Fields:
The list of DataBase fields you want import fropm the xml and the reference you setup for each fields. Use the Add/Edit button to poputale this list. When you click on the Add or on the Edit butto a PopUp open with all the parameters you can setup for each DataBase fields, like for the master panel.

