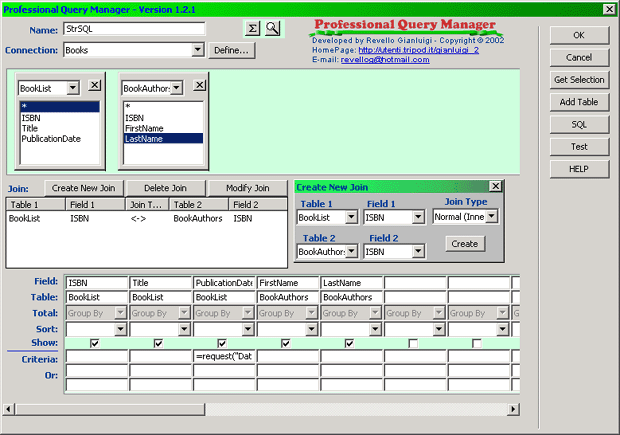
1°) | Open the "Professiona Query Manager" pop-up window from the "Application Objects Menu" | |
| | |
| 2°) | In the Field Name write the name of the SQL statement |
| | |
3°)
| Select a valid connections |
| | |
| 4°) | Click on the "Add Table
" button to insert the table
|
| | |
| 5°) | In the "Table List Menu" select the table whose data you want to work with. |
| | |
| 6°) | Repeat the steps 4 and 5 for the second table
|
| | |
| 7°) | Click on the "Create New Join" button.
The "Create New Join" Panel appear |
| | |
| 8°) | Select the table in the Table 1 list menu and the Field in the
Field 1 list menu |
| | |
| 9°) | Select the table in the Table 2 list menu and the Field in the
Field 2 list menu |
| | |
| 10°) | Select the type of Join in the Join Type
list menu |
| | |
| 11°) | Double click on the fields you want add to your query |
| | |
| 12°) | Specify the criteria that limit records if required |
| | |
| 13°) | Select a sort order in the Sort cell for the fields you want to sort |
| | |
| 14°) | Select a sort order in the Sort cell for the fields you want to sort |
| | |
| 15°) | To view the result query code click on the "SQL" button
Click the Test button to execute the query and ensure that it retrieves the information you intended
(Remember the test mode work without criteria) |
| | |
| 16°) | Click the "OK" Button
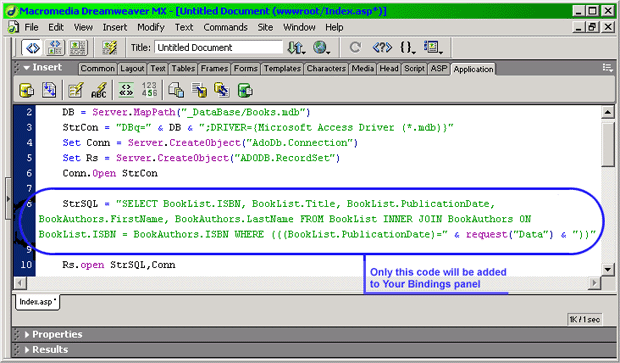
The newly defined Query statement appears in the Bindings panel. |
| | |
Grafic Example:
 |
| | |
The corresponding code inserted in Your page:
 |

