This page is valid for all the supported SocialNetwork
Name
Disabled, for future developements
SocialNetwork Id
The SocialNetwork app_id you must get from your SocialNetwork account
For security reason this parameter has been moved in the page setup behavior
SocialNetwork secret
The SocialNetwork secret you must get from your SocialNetwork account
For security reason this parameter has been moved in the page setup behavior
Redirect success
The page where redirect after a succesfull log-in
Redirect failure
The page where redirect after a failure log-in
Redirect log-out
The page where redirect after a log-out
On logout
The behavior
On Logout
If checked the extension remove the Dreamweaver session used to maintain the log-in info on your site
Log
If checked the extension create a log file, use this option only to debug in case of problems.
Log file
The log file path and name
SocialNetwork user fields
The list of fields your site can receive from SocialNetwork, you can use this fields to show users info on your site. The list contains some predefined fields but you can add your own SocialNetwork fields on click on the Add button.
Connection
The connection to your database used to finalize the log-in on your site after the user is redirect from SocialNetwork site.
Enable
Enable the log-in on your site. We put this as an option but normally is required.
Table
The table in your database that contains your users info.
Mail
The tabkle field that contains the e-mail of your users. The extension use the e-mail to check the user is enabled on your site. We use the e-mail because the e-mail is the only field we receive from SocialNetwork that can identify the user.
Custom where
You can use this field to add some custom where in the sql.
The extension will add this sql code to the query used to identify the user log-in. The content of this field must be a valid sql where.
Dw session field
The table field the extension save in the Dreamweaver session "MM_UserName".
The extension use the same session name as the standard Dreamweaver log-in behavior so this login will be compatible with the standard Dreamweaver restrict access to page behavior.
User level field
The table field the extension save in the Dreamweaver session "MM_UserAuthorization".
So you can use the standard Dreamweaver restrict access to page behavior with the option level.
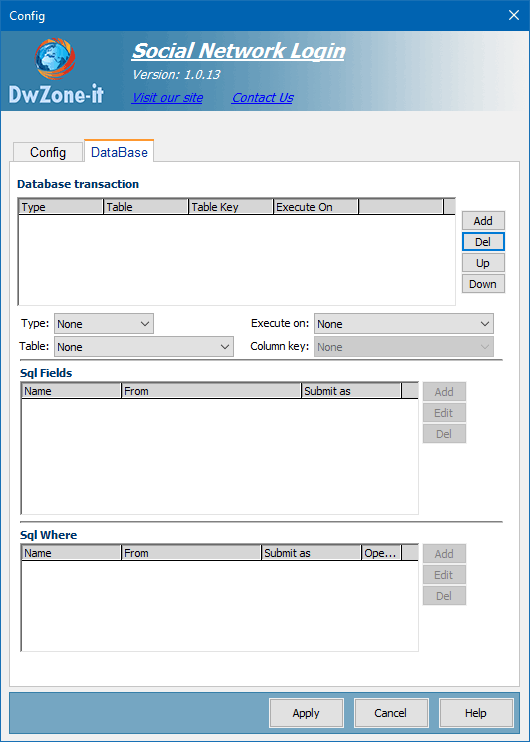
Database Panel:

The database panel define a list of transaction you need execute on the databse to finalize the payment. A transaction is a sql query you want execute to insert, update or delete one or more records in the database.
You can define how many transaction you need without any limit. The transaction are execute in the same order you enter in this panel and is very important you put the transaction in the right order they must be executed.
Transaction:
The list of transaction you setup
Type:
The type of transaction like INSERT, UPDATE or DELETE
To create a select you can use the standard Dw recordset behavior.
Execute on:
Define when execute the transaction. When the user return back from SocialNetwork the extension verify the login on your server and the user can be VERIFIED or NOT VERIFIED. So you may have some transaction you want execute in case the login is verified and execute others if the login is not verified. With this option you can define exactly when execute a transaction.
The value can are:
- Always: will be execute if the login is Verified or if is not verified
- Verified: will be execute only if the login is Verified
- Not verified: will be execute only if the login is not Verified
Table:
The database table you want execute the sql query
Column key:
Available only for insert transaction define the database table unique column key field. When you setup an insert transaction may be you need retrieve the value of the key column of the record you insert. On setup this field you will be able to retrieve the key value of the record to use in the others transaction. The transaction are execute in the same order you enter in this panel so the value of this key colum will be available only for the next transaction. When you define this field you will find in the "Get value from" combo of the Add and Edit popup a new field, at the end of the list,
like this image:

For example the
Transaction(3):Id will return the value of the key column of the transaction number 3.
To be sure the extension return the correct value use a numeric auto-increment field in the db to define this unique column key.
Repeat:
You can setup how many times repeat the same transaction. To do this you must choose a recordset name from this combo and the transaction will be repeated for each record in the recordset you choose. This is usefull for insert the details record for an invoice based on the OrderDetail record where for each record in the order detail table you must create a record in the invoice detail table.
Sql Fields:
Define the list of fields you want insert or update in the transaction, where get the value of this fields and the data format.
Disabled for delete transaction because in the delete you remove all the record.
Use the button in the right to manage this fields list.
Add/Edit Field:
Database field:
Select the database field you want insert or update
Get value from:
Choose a source for this field value. When you open this combo you will find the list of available source you have in the page.
Like the image belowe:
In this image you can see some fields start with "SocialNetwork:" this are the field SocialNetwork send to the page.
Entered value:
If you want enter a fix value you can insert it in this field. This field can be used also to get a value from your own function, in this second case you must write in this field the name of your function like:

or

Submit as:
The data type is the kind of data the column in your database table is expecting (text, numeric, Boolean checkbox values).
The available data type are:
Text (Null)
Text ('')
Integer (Null)
Integer (0)
Float (Null)
Float (0)
Date DD/MM/YYYY
Date MM/DD/YYYY
Date YYYY/MM/DD
Checkbox Y,N
Checkbox 1,0
Checkbox -1,0
Checkbox MS Access
Custom The value between parentesis are the value insert if the field return a null value When you use the "Custom" value you must setup the entered value from your custom function.
I add one function in the page to get the current datetime and the name of this function is getDateTime() so in case you need add a datetime field value in the database you can setup the EnteredValue field to "getDateTime()" and the SubmitAS field to "Custom"
Sql Where:
Define the list of fields you want use in the sql where of the transaction. You must use this fields for the update and delete transaction to find the exact record you need update or delete. Work like any other sql where you use in your standard update and delete pages. Disabled for insert transaction.
Use the button in the right to manage this fields list.
Add/Edit Where:
Database field:
Select the database field you want insert or update
Get value from:
Choose a source for this field value. When you open this combo you will find the list of available source you have in the page.
Like the image belowe:
In this image you can see some fields start with "SocialNetwork:" this are the field SocialNetwork send to the page.
Entered value:
If you want enter a fix value you can insert it in this field. This field can be used also to get a value from your own function, in this second case you must write in this field the name of your function like:

or

Submit as:
The data type is the kind of data the column in your database table is expecting (text, numeric, Boolean checkbox values).
The available data type are:
Text (Null)
Text ('')
Integer (Null)
Integer (0)
Float (Null)
Float (0)
Date DD/MM/YYYY
Date MM/DD/YYYY
Date YYYY/MM/DD
Checkbox Y,N
Checkbox 1,0
Checkbox -1,0
Checkbox MS Access The value between parentesis are the value insert if the field return a null value
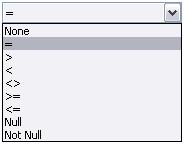
Sql operator:
Define the operator you want use for this field.
The available value are:


